Thursday, March 27, 2008

Codename: Upgrade 420a Talon gets Photo Shoot! Fresh paint and a Turbo kit makes this car shine


The Talon gets to show off some of its stuff. Of course the goal is to make it into a magazine. Right now we have been featured to represent the turbo kit supplier Treadstoneperformance.com . Here is the URL where the project is featured. Just go to galleries then vehicles! http://treadstoneperformance.com/gallery-items.phtml?ck=5 This is the gallery and the specific link is http://treadstoneperformance.com/gallery-item.phtml?ik=28
These pictures were takin down main street inside the First Tennessee Hanger. At this point we have not done detail work like coating the exhuast or installing the turbo heat shield. The candy red calipers are coming soon as well as chrome wheels.


Monday, March 17, 2008

Codename Upgrade Talon gets Featured by Treadstoneperformance.com

Wow, Treadstone Performance Features our car!
This may seem uneventful, but I have been submitted as the featured car representing the Treadstone company. Thay make turbo kits for 6 or 7 different cars. They are currently a Turbonetics Dealer and I am using a manifold like theirs and a Candy Red T3/T4 Turbonetics Turbo. The specific link to the gallery is : http://treadstoneperformance.com/gallery-items.phtml?ck=5

I am listed beside SRT-4 Neons, Subaru Sti and turbo Mustangs. I was really surprised when they literally noted my name. They are waiting for me to get some good pictures up and make a paragraph to list on the site now. WooT! Is this a Sudo- Sponsor?

These are the kind of cars that I am listed beside. Its kind of cool to be held beside SRT-4 an Subraru STi cars like this! I believe the best goal is to be in a couple magazines. One magazine for the interior and another magazine for the build up from a busted talon to a decent show car.

Tuesday, March 11, 2008

Eagle Talon get paint and wet sanding soon, Shop picture

The car was just put together at this point. This picture was takin at 12:30am on March 11 08. These are the OEM wheels and aftermarket lights. The sidemarkers are also aftermarket. Everything else is original on the body in this shot. I do have plans to install some greatly needed side skirts. I priced the side skirts from Oem Mitsubishi at $170. Thats the best deal I found on those. The car is not completely done. It still needs wet sanding, buffing, and polishing. That removes the Orange peel. He really needs its chrome shoes back on now! :D


A few days ago this car Looked like this, Absolutly stripped of doors, seals, interior panels, tail lights, bumpers, just about everything that will unscrew besides the engine components.


Two new fenders were installed as the old ones were simply not salvagable. I managed to purchase both of them for $140 if I remember right. The car was turbocharged about 2 months prior and that was its own project all together. I need to have it tuned now.

Monday, March 10, 2008

1997 Eagle Talon 420a Turbo DSM finally gets Custom Paint

And in the Beginning....


A Long Long time ago.......

(About a month and two days from Feb 10 08)


( drums, dum dum dum da dum)


In a Far Far Away Place .......


( about 7.4 miles according to the gps)


In Advance Collision it began.... There were many parts...

There was one Spray gun, with guey sparkle stuff in it, to rule them all.....

Here you see the Prismatique Crystals in the Clear Coat solution. This stuff sparkes like stars as you look at it becuase they are so small. Unlike metallic coat these change with direction and lighting conditions... Its Precious.. Dum Dum DUmmmm!


And its all up to this Painter , Mr. Jolley


There are still parts that have no coating at all. The two left were the Center sections for the tail lights and the Deck lide needed two tone black and silver paint, then clear over twice. Mr. Jolley cleans the area to be painted vigeriously with a scouring pad and some kind of buffing compound.


Here Mr Jolley taped off the Center section and the slack will be wrapped around and hung from the rafters.


No really we hung it from the rafters. I am digging the spearamint flavored tape. Mr jolley was digging it too.


There are tough descisions to be made. Mr. Jolley had some Captian Morgan to think it over.


Here is the second part that needs paint. Its a rather large one. This is the decklid that will be taped off, primered, sealed, painted silver and the reverse taped and agian painted Black for the top. Mr. Jolley will coat the decklid with the Precious and then coat agian with clearcoat.


Mr. Jolley taped off the black topside first. I think that we have wasted a small spruce worth of paper on this car. I am just waiting for the treehuggers to attack us for plundering their forest.


Mr. Jolley is a perfectionist and goes over the black areas twice for better coverage and depth. The decklid will take a couple hours or more to dry enough to touch. Though we have a Oven to bake the paint its really for production and actually weakens the paint. Its also not the same shine as a car that dried without the 180 degrees of heat.


The Eagle Talon Hood is a beauty in itself. The hood is painted hear but has dust from being sanded some to remove imperfectinos before clear coat.


The hood was pretty dirty after all the sanding and it was very important to clean it well. The solution is water and alchohol he is spraying on the base coat. Mr Jolley is getting it ready for the Precious


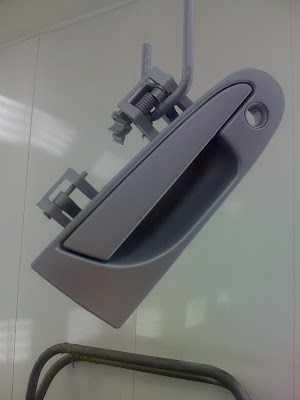
Those pesky door handles on the Eagle Talon and Mitsubishi Eclipse seem to dryrot and break. I have a set of new ones The handles were removed completely to make sure they had coverage all over. This is before the Clear coat was applied.


Door handles were removed so why not the gas door. Doesnt the gas door deserve just as much attention. Well it got what it wanted. The door was painted 360 degrees to make sure its fully covered. We really dont want anyone to know that the car was originally white.


The Frost White color really is bright before clear is applied. This ofcourse is the rear after basecoat was applied from the rear.

From the front it looks like barely anything is actually being painted right now. The bumpers were painted by themselves becuase they needed adherence promoter because they are plastic. Then they were sealed before base coat.


Even though the car was just painted and has not left the filtered air of the paint booth, the car is wiped with a tack cloth. The cloth is like a shop wrag thats sticky. It will pick up any small hairs or dust left over from the base coat being sprayed on.

Before Clear coat over the Base Frost white

The paint really looks slick after the clear coat was applied. After this layer becomes tacky another layer of clear is applied. Theres no need to worry about runs at this point as the entire body will be wet sanded and buffed then polished to a Glass shine. Wet sanding removes "Orange Peel". This is somthing caused by the paint slowly moving down with gravity after its sprayer but before its dried. Its a wavy look that most if not all OEM Paint jobs have from the factory. they simply will not take the time to remove the waves.

Removing the door handles made it easier to get to all these edges. I have seen handles painted on the car and they are fine about ten feet away but when you see them up close there are tons of flaws and uncolvered areas. Most get away with that because they painted the car the same color it was before. so a missed spot is not a big deal.


I took this one for my family. I think they were suspecting that I sold my car as I have not had it for a month and its been 6 weeks since they have seen it. I really am getting to warm up to not having a badge. I think that I can survive without it , if its no longer avialable from the dealer.


Bumper as I seen it. I was not hear for the front a rear bumper being painted. They were painted during the day and I was at work. The front and rear bumper were painted together. They both had adhesion promoter applied and sealer. The piece at the bottom of the windshield was painted too at the same time.


The hood was wet sanded about 15 minutes before this picture and then buffed with three progressive compounds from 3M. The hoods orange peel is almost non existant and clear is like glass.


Here is this picture of the difference between W26 Frost White and W12 Northstar White. This picture was takin at dusk but I feared that the next day Mr. Jolley would be putting the Eclipse / Talon back together agian. Then the line would be gone behind a tail light at that point.


Wow the car is pulled out of the booth now. I really with it already had the front bumper on hood for this picture. I am thinking the car will be back together and drivable tonight and tomorrow do all the Wet sanding and buffing. This is good though as it will give me time to remove the racing suede seats so better mounts can be made and the Apexi Fuel computer and new injectors and O2 sensor can be put in. The right turn signal wire came loose. i believe it was pulled loose when removing the front bumper. I hade soldered the wire and then Hot glued the gap closed to seal the inside of the turn signal. Tail lights and turn signals are notorious for getting water in them after a bumper has been removed. I will do it agian. Its a small price to pay for you ride to have some sweet new clothes :)

Friday, March 7, 2008

DSM Eagle Talon 420a Turbo Gets in the paint booth for custom paint


Here is Chad taping off the rear hatch hole. All the oriphices must be painted over. Door jams, and Rear hatch jam is whats being painted first, then the doors and rear hatch will be reinstalled to paint the whole car over. You can see here that he had to repair a chip in the paint I developed on teh rear bumper. I was fiberglassing a mockup mold to see if I would like the setup for subs in the rear seat and a drop of fiberglass landed on the bumper. Later I tried to pop the small sliver of resin off the paint like I have done every other time with success and it popped the paint off instead! Who knew the bumper was really black up under there. Strange becuase the front bumper is a yellow color on the inside under the paint.


Chad tapes over the other side of the rear hatch. Both doors were already done at this point. All the parts are laying in the next room. The whole booth wash washed and new filters put in the cieling before he pulled the car in.


Picture of Passenger side without the painter standing there. I dont know wat he is goint to prime the car. I covered both Sueded seats with a blanket that I used to get the new hood home.

The tail lights are sitting in the car at this point. I have contiplated having the tail lights retinted. To do that I must first wet sand off the black thats there and get it to a 600-800 grit finish to be able to respray with good quality. The Tuberon exhaust is still looking good. Because of the overly rich situation ( small idle tuning issue) when I leave I need to bend a piece of card board and tape it over the exhaust tip. That will extend how far the exhuast blows out to prevent damaging black sutt with unburnt gasoline in it to collect on the fresh paint of the rear bumper.

Here is the current condition of the 420a Turbo install. It is still looking very nice dispite the dust and rain that has been going on the last three weeks. It has rained on the car 5-6 times. The manifold and turbo have incurred a small amount of surface rust spots as a result of not being started. Both surfaced will see acitone and a fresh coat of High Temprature Black spray before I take the car to a meet or car show. Otherwise there are no rub marks from the Oil and fuel lines on any powder coating that I can see. I changed out the filter with a APC Turbo Filter with Heat shield and I am so so about the way its installed. Due to its shape movement is limited. The filter just doesnt ever feel really tight on the pipe, it can still flex a little at all times. It may be due to the fact the base of the filter is silicone and not hard rubber like some other filters.


I thought this was really funny. There were alot of employees in the shop tonight and you have a random body guy spray painting a table on the floor standing in front of a Paint booth with a painter. Just goes to show you you either can do Body work or Paint but not Both!


I think they were using every stand they had here. Its like my car Sneezed really hard and this is what happened! The Hood , Hatch and both doors are off right now. All the jams, under the hood and under the hatch had to be painted to match. The rear hatch was the only part of the car free from dents and other imperfections. Ironically because most Import cars more than ten years old have dents in the trunks deck lid ,or even worse, hole drilled for wings and spoilers.


The passenger side door has already had it's jam painted as it sits here. The color is pretty cool. Its a cool silver, frost white color. You can see the stock hood in the background here and it has two small dents filled in it. Even the underside is being painted. We already removed the insulation from the underside of the hood and will add some better insulation later from DEI or Thermo-tec. The Matts that have aluminum coating and are good for 1000 degrees radiant heat protection.


The drivers side door recieved the same treatment of painting the jams however this door had more filler and primer. Seen here the door has already been wet sanded and washed. The painter texted me about ten minutes ago to let me know the car is now back together and tonight it is being painted all over and clear coated to be ready for pickup tommorow.


Tuesday, March 4, 2008

Car being dimantled getting ready for Paint. 420a Turbo Talon

DSM Gets Dismantled for Paint , Eclipse / Talon


First off sorry for the Blurr in the lights. They are halogen and very bright. Here is the Turbo DSM getting naked for its big make over. At this point there have been two dents on the Hood Fixed, one on the driverside fender, two in the passenger side rear fender, two in the drivers side rear fender and a chip fixed on the rear bumper. Both doors had around ten dings that were smoothed over. The Front bumper was removed to sand and primer it. The front bumper has "spider cracks" This is where the bumper flexed and shattered the paint, this was due to an accident "hit and run" from jessies neighbor. Now and days flex additive is added to paint for bumper to reduce ( prevent) cracking for about 10 years.


This picture was takin about a week before the doors came off but its a good picture and went with the subject. The Dents were filled in the doors in this picture and then primered.


The 420a has seen alot of dust over the past two weeks in this shop. This is a diagnal shot after the hood was removed. The doors came off first however. I do like the new Bulbs I installed in the turn signals while the bumper was off. They are sorta clear bu when you pu power to them they are amber. Very cool. They come OEM on the 2007 Eclipse so I tried them out.


This is the area that was damaged I didnt even know about on the passenger side fender. The damage was very light however they filled in this low spot and primered it over. The door jams are being painted today from what I understand. the painter got behind on his side work and everything has been delayed a week which left me without a car. Using cabs suck but its better that walking.


Monday, March 3, 2008

420a Eclipse Candy Red Ported Intake Manifold with SRT-4 Injectors Installed


Here is the mockup of the Intake manifold setup. This manifold has been Dipped and sandblasted to remove oil gunk buildup that occurs from the emission system. Oil can build up for blow by on the turbo as well but my engine already has thousands of miles on it well before it ever saw a turbocharger. If you look inside of a stock 420a engine with around 100,000 miles on it or more you will see at least a 1/8 inch thick build up on the inside. In some spots it can build as thick as 1/4 inch around inlets and outlet nipple and sensors. A little buildup has minimal effect however at the buildup gets taller that the dimples and flasking on the inside of the intake the air stops tumbling inside the intake. This is a common problem with ported and polished intakes however when it does it without being ported and polished your just burning extra gas at a loss of power. Thats right you lose power at this point as there is less airflow ( like a clotted artiry, think of the grease as butter) and less fuel atomization ( the fine mist that makes a clean burn).


We are limited in alot of ways by doing a Mild Port by hand. I could smooth out the inside of this manifold with a paint mixer and sand paper or even a electric " nail file" approach. You can purchase thin electric nail files for maybe ten dollars and they are about as thick as a double a battery. Attach them to a dowl rod and you could reach most of the inside surfaces. The surfaces to pay particular attention to are the flat surfaces Directly in front of each port. Also the edges can be smoothed out some around the edges of the port. This area does not cause the air to tumble so it will not affect idle.


The part of the Intake that supports low rpm idle is the last three inches of the intake plenum. Literally from the support flange ( little dimple you see on the bottom its sitting on) to the Main flange that mounts to the head. This is the intake I have for my 420a Stage 2 Turbo Setup I am about to put into commision. The injectors are 270cc SRT-4 Style injectors. These are actually set to flow LESS . This is due to the drop in fuel pressure. The FMU will be dropped 15 psi ( maybe more if needed) to correct the difference in injector size and the FMU will be given a more aggressive Boost to pressure ratio. The car really seems to want more boost than 5 psi I have been running the last three months. I have a Turbonetics T3/T4 so only running 5 psi really is a drag. I have considered switching to a smalled T3 that could still flow 350Hp. Anyways, these injectors will flow around 550cc at 85-90 PSI from the Walbro HP 255L Fuel Pump. The pump and FMU can produce 110 PSI of pressure so 600cc + is possible with this new set. However I want to keep the pressure low arround 85psi if possible to conserve the fuel with better fuel mix.


This is a picture of one of the injectors up close. They really are not much bigger than the OEM. However they flow 90cc more at idle than the OEM ( Oem injectors idle pressure is 55 PSI, Accel injectors 45 psi or less)