Thursday, November 29, 2007

East Ridge Auto Alignment, Inc Install Done

East Ridge Auto Alignment, INC
A complete service center
5506 Ringgold Rd.
Chattanooga Tn 37412

Phone: 423 894- 8221
Fax: 423-894-8234

Brian A Rogers
"service manager"


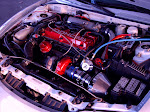
My picture of the car at the mechanics after I installed the turbo for them to have somthing to connect the oil supply line and oil drain to. Yes I really did do this for the Mechanic. I applied blue masking tape so the mechanic wouldn't scuff the Candy Red valve cover. They thought turbocharging to be a liability so they will only install the fuel pump, regulator, and oil feed line. Everything else is Josh. Theres no wastegate spring installed here.
Test Fit the Turbo, the Downpipe had to be cut, then rewelded to clear the oil drain and water crossover pipe. If the exhaust is directly agianst the water pipe it will boil your water, and overheat everytime. FYI

I removed the Exhaust Manifold, and slightly cleaned the exhaust ports.


A view with Stock Cracked Exhaust Manifold ( cracked where tubes meet ). Blue tape applied to protect valve cover at mechanics, when installing fuel regulator.


This is all so the oil supply line can be installed for the turbo.

Okay anyone who is reading knows I took the car to this place ( East Ridge Auto Tune) to have the oil line installed , fuel regulator and fuel pump. They had the fuel regulator and pump done fairly quick and ready the next day but said they needed me to install the turbo before they could put the oil line on. Grr, but makes sense. So I tell Brian " shop manager" that I will come in the morning to do it, then they can finish.

While I was there a guy comes out and watches at the edge of my fender for about 5 minutes without saying a word. I can't stand this!
So he says " well I guess you are the owner of this car"
Me: Yes, I am josh
:: I continued to tighten the nuts on the turbo manifold::
HIM: " You know it doesnt look good to have a customer takin his car apart outside our shop, We really dont want that, I am sure you understand"
Me: I understand completely, I dont want to be pulling my car apart in front of your shop either but you havent finished your job and asked for me to install the turbo so you could install the oil supply line as your shop didnt want to for liability reasons"
HIM: :: crickets , he doesnt know what to say::
:: he walks off::


After being slightly peeved, I pulled the Lower brace out of jessies trunk that was removed when the Intercooler piping was bent accross the street at the Maxi Muffler , so they could reinstall it. It also has to be off to get to the oil supply. The manager Brian said he would take care of it. I went back to work not a moment to soon. Only complaints after the install was tehy routed the steel lines to sit ontop of my freshly painted valve cover, Lucky I had tape on it to protect it.
COST after tax- $334


Tuesday, November 27, 2007

East Ridge Auto Alignment, Fuel Pump, Boost dependant Regulator Install

Fuel Pump 255 Liter Walbro
Boost dependant Fuel Regulator

Oil LIne and Drain Line


Today Tuesday, Nov 27 07 , I dropped the car off to East Ridge Auto Tuning to Have the Oil Line Installed in line with the sensor. Heres whats on the agenda there.

Install Walbro 255L Fuel Pump

Install Hahn Adjustable Boost Dependant Fuel Pressure Regulator

Install Hahn Late model Fuel Kit ( return line hose and steel high pressure hose)

Install Hahn Fuel Mapper , also known as fuel cut defender!

I am guessing these parts will run 300 or so to install. I left the instructions to everything with them.

Treadstone Performance Blurb, They sent the wronge part

Okay, everyone reading this car write-up knows that I detail every moment of this install and take pictures as if things disappear instantly without warning ( if you live in the hood they do he he). I ordered a Oil line kit here http://www.treadstoneperformance.com/~treadstone/product.phtml?p=215&cat_key=89&prodname=Turbo+Oil+supply+line%2C+and+fittings

He guaranteed fitment.... I even called and asked if it fit both sides as I was skeptical, he verified that I needed their 36" oil line kit. Well the back of the 420a motor doesn't have a 1/8" little bitty screw hole. It is a whopping 3/8" inch. FYI 3/8" is measuring from the INSIDE of the fitting, so the outer diameter is like 3/4". Treadstone sent all the fittings WRONG. The 1/8" doesn't fit anything on the block at all. On top of that you must also have a T fitting so the oil pressure sensor and oil supply line feed from the same hole. I emailed him earlier today and he indicated all I needed was a 3/8" to 1/8" adapter then. Which means I would need one adapter for where it attached to the engine, one adapter for the oil line itself and another adapter for the oil pressure sensor ( that is 3/8 not 1/4). So that means I need to purchase 3 3/8" adapters due to them sending the WRONG fitting to begin with. Each of these fittings are about $5 each, so to make my oil line work he wants me to fix his mistake with all these extra fittings, NOPERS ! I called Hahn Racecraft and got a 3/8" fitting , that way it will match the block and the 3/8" sensor, but I still had to purchase 1 3/8" to 1/8" fitting to adapt the oil line itself, saved another $10 on fittings he wanted me to buy. I am a sore customer, I buy a ton of this Turbonetics turbo stuff then this happens, and then I get a poor answer instead of a " its okay , I will fix it" . What has happened to customer service these days? If these guys have a turbo kit for a 420a eclipse, the parts should fit, PERIOD! Becuase treadstones " give a dang" box is broke, I am telling everyone! I cant stand paying an excess of 2000 for these Turbonetics parts and then getting a " go fix it yourself, go to the hardware store" answer. The ONLY reason you purchase parts like this from somone that sells turbo kits parts is because you want them to be right, and if they arent you have somone to serve you....customer service.

Monday, November 26, 2007

Downpipe Reweld and Intercooler pipe Bend + Weld


I dropped the Talon off on Black Friday, Nov 23 07 at the welder

Update for Sat, Nov 24 07 - They did not have time to touch it

Update for Sun, Nov 25 07- They were closed, did nothing

Update for Mon, Nov 26 07- They managed to get to the car today as they were slow, They Bolted the turbo and manifold up and saw the issue I had. The previous weld job did not clear the water pipe, so installation at home was impossible as long as the part did not fit. I had them totally cut the wastegate peice off and carefully cut a new one at a rediculous angle. Then there was the previous issue that I had known about from the begining. There was a three foot section of intake that was missing. The intake is stainless steel pipe so the shop could fabricate an extension to reach the intercooler from stainless tubing intended for exhaust. Instead of Just bending a section and attaching it with a hose coupler, I had them flare the intercooler piping tip and weld it directly to the new segment. I had them do this just because the fewer number of connetions the better, the only thing that you ever take into acount with intake tubing is If its flexable ( because the engine rocks back and forth when driving) so that a coupler doest pop clean off while accelerating ( engine abruptly shifts backwards).

They are charging $164 ...........................Ouch, but everything fits according to the guy on the phone.


Tuesday, November 20, 2007

420a engine turbo oil supply line


This is the diagram for the Oil supply to the turbo. The Hole on the back of the block is a 3/8" NPT (nation pipe thread standard) So what has to happen is we use an adapter from 3/8 to 1/8" NPT that matches the threads on the turbo oil suppy line. Some ask " why dont you just use a 3/8" hose?" more is better right............Well not always, drinking plenty of water everyday will help you stay healthy too much can drowned you. Same is for the turbo. Turbo's are designed to have oil squirt out a lubed bearing then dribble down the oil drain. The larger the hose the more oil goes there. Not to mention there would be a parasitic loss of oil pressure everywhere else in the engine, too much pressure would force oil through the seals on the turbines and would result in burning lots of oil. So lets Keep is simple 1/8" standard thread. I purchased a adapter today, I hope everything bolts up just like it does on paper.

Monday, November 19, 2007

FMIC Intercooler Test fit 420a Eagle Talon

Intercooler test fit, Just seein how it will look but not hooked up yet. I always recomend removeing the Bumper, and test fitting a intercooler before installing, Not only may it not fit but It might be ugly as sin too.

Turbo 420a Install Update , Next steps

Here is the install progress picture, I have pictures that are better and will list them all together once this thing is done. The most difficult part was removing the exhaust manifold. There were two bolts that rounded off on the bottom. After a few attemps to get the bolts to turn after soaking in WD-40 all night, I Cut all the way around them with a Hard Top Chisel. Suprisingly a 2 pound hammer with this chizel cuts through steel with little effort. I hade the heat shield off in about 15 minutes, then the exhuast manifold off within the hour. I had to remove the radiator the get the manifold out though. I took the opportunity to flush the radiator and get the leaves out. Leaves over a couple of years have a tendancy to collect in front of the radiator blocking air flow and generaly looking bad.
NEXT STEP:
The next steps required me do make noise and given it was already 11pm, that was the stopping point for last night.

1. Install the oil drain in oil pan- very simple but requires the exhaust to be off to remove the oil pan. The drain is a bolt in type fitting but theres NOT a hole for it. You must drill one, install the fitting with appropriate sealer and washe the oil pan out. There are many metal shavings that are made when drilling and the pan must be clean enough to eat off of before putting it back.

2. Reistall the Oil Pan- after the drain is installed, and oil pan cleaned, then we need to apply sealent to the oil pan edges and loosly bolt it up without oil, After an hour or so I can tighten them down all the way.

3. Install the oil supply line for turbo- The turbo needs oil or the darn thing just wont turn and we cant have that! Theres a oil pressure sensor on the back of the engine. Its a pretty big hole. Most turbo installs get their oil from this hole because the oil that comes from here comes directly from the filter, giving about the cleanest oil you can get in the engine. This line must be hooked up to the turbo before the engine can start for the first time, otherwise its like running a engine without any oil..........because you are :P

4. Install the Down Pipe and wastegate- Okay now that we removed our stock " slow" parts and added the turbo and its manifold, we gotta get our exhaust connected to the exhuast on the turbo, this thing isnt a drag car it still needs a muffler. We already have a Down pipe made but are unsure of if it clears the water tube that runs behind where the old stock exhaust use to live. Lets cross our fingers everything just bolts on.

5. ADD oil- Ok by now I have fiddled around with the downpipe for an hour and can now add oil to my engine and prime the Turbo. I say this bacuase the gasket maker I put on the oil pan has probably dried by now. "prime" is a fancy word for adding oil to the turbo since it hasnt seen any lubrication for 3 months now and definatly needs some before starting the engine for the first time.

6.Install High flow fuel pump- Ok well now we should already have the Downpipe installed and everything is peachy now we can install the fuel Items. First we need to install the Fuel Pump in the gas tank, NO SMOKING PEOPLES

7. Install " late model fuel kit"- The late model fuel kit is two high pressure fuel hoses and a Steel Return Fuel line that I need to run from the front of the car all the way back to the fuel tank.

8. Install Fuel pressure regulator- This boost dependant little buggar raises fuel pressure as boost rises. Very nifty. It keeps the fuel ratio to air correct when boost changes. The replaces the old one. Cant wait, this is the home stretch :P

9. Final stuff- okay plug up the vacuum hoses for the turbo, wastegate and fuel pressure regulator. Double check everything.

-Install the Air Filter

-Put the Radiator back in and fill with Coolant

-Bolt the Turbo housing up if I haven't already " cuz things work better when they are bolted together well"

- Install the Map Sensor bypass thingy, and the HKS Blow off valve

-Run a vacuum hose to the HKS Blow Off valve

-REGAP THE SPARK PLUGS SMALLER, and plug the wires back up.

Thursday, November 15, 2007

Apexi Turbo Timer


I Dont have this one yet either, also somthing I need. I am really into the Apexi stuff and its nice to know theres a gismo out there thats made just to get the job done, with a no brainer. Depending on the season your car needs to idle for a different amount of time to cool, and if you drove it hard more time cooling is needed to, check out this article.

The Apex Auto Timer allows the vehicle to idle for a preset amount of time after the ignition key has been removed. In turbocharged vehicles this prevents hot oil in the engine from coking up in the lines. Hard driving can raise engine oil temperatures to dangerously high levels. The new Auto Timer can automatically determine the necessary amount of after idling time. By inputting O2 sensor voltage, the Timer can also display theoretical air fuel ratio. The Timer can also display critical data such as O2 sensor voltage and Battery Voltage. To prevent potential theft while running, the handbrake safety feature shuts off the vehicle when the handbrake is released without the ignition key.

http://www.coximport.com/prod/405-A011

Apexi Boost Controller Limited Edition Black $370

I am in great need of a quality electronic boost controller, however even a cheap on is 200. I believe I will hold out for this one even though its much more exspensive everyone says its worth it.
Much like the styling of the Black Limited Edition Apexi S-AFC- II I have, the Apexi boost controller has covetted looks. The compact square shape makes installation into custom areas easier. These units have some bulk to them and are so exspensive you want to install them in a Permenant mount away from harm yet easily accessible for adjustment or viewing. These very sofisticated Computers control every aspect of Boost, you can change what boost you want to run every 100 rpm increment. They are not cheap though. Retail can be up to $800 This unit is so sofisticated I am unsure if its needed to have a S-AFC-II ( air fuel computer) Though most things in life are too much at retail price, you can purchase a Black Apexi Boost Controller for $370 on ebay, less than 1/2 retail.

Wishlist- Intercooler on car


This is the Hahn Racecraft Intercooler. It is very big however I dont know excatly how big. A intercooler with higher cooling capacity means that you get colder air going into your engine, Colder air means more power. You reap the power benifits without needing to increase Boost. This means Safer and stronger power, longer engine life. Cost - $600


Monday, November 12, 2007

Intercooler Piping Issues


As we can clearly see here there are three main pipes pictured that I recieved second hand. I was told it was a complete kit, Hmm maybe they fibbed. Things dont add up. There is the pipe that runs from the left of the intercooler to the right, So thats one. Then there is the Pipe that Connects to the Intake manifold on the engine and only extends to about where the air filter is, Thats two. Then the third runs from the intercooler to the Turbo. The issue is that theres a peice that extends from the Upper pipe connected to the intake manifold down to the Intercooler. I was furious! So now along with all the other things I get to make I now need to custom make Intercooler Piping as well. I believe any muffler shop can bend and weld my missing segment however it wont be polished stainless steel. I will be forced to paint this segment or Powdercoat it Candy Red Like many of the other Parts. I estimate this will set me back 100 dollars and half a saturday to have this segment welded. Before I have it made I need to mount the intercooler so that then have a point of reference to bend the pipe to.

Friday, November 9, 2007

Progress for Starnes Custom Turbo Setup


Here is everthing sitting in the respective places. The Air filter is to the right. Take in mind I will have a True flow air filter later on however I already had this one. The Red is the Cold side of the turbo. The Stainless to the left of the turbo is the exuast side and the Stainless to the right is the air Intake sitting as it would in the engine bay. The Couplers will be BLACK not blue and they will not droop as in this picture. The reason nothing is straight is that nothing is bolted together.

Grounding Kit Installed on Eagle Talon 420a


After the Installation of the RalliArt Mitsubishi Grounding Kit


Here is the Compairson between Wires than were replaced and the 8 guage RalliArt

Immediatly I noticed my car idled about 100 rpm higher and smoother between 800-900 RPM. I have notice that it has longer starts so one of the grounds that goes to the starter actually needs to be bigger. This is a cheaper grounding kit from Ralliart. Ralliart is a reputable brand. This makes since because a starter can draw 130 amps for a few seconds and the wire is only rated at 45 amps. I will double or triple up for that particular ground. The good thing is that its easier to replace or upgrade wires now that they are bright red. If one was to ever come loose it is easy to find. Overall with a little tweaking with some extra wire to support the high amperage devices this should all work really well. The only thing I dont like is the material that the negative clamp is made from. Aluminum! Aluminum has 1/3 the conductivity of copper. I have every intention of replacing this with a copper version of my own. So far I have 28 dollars in this particular project. The goal is to increase grounding and make it easier to find all the wires in the event I upgrade ( Which I am SURE I will in the near future)

Later I will go to a all 4 guage set-up. 4 guage copper wire will flow 90 amps of current, at car stereo grade. This is a great expiriment to see how much wire I will need to make my own grounding system. I plan to mimic the Hyper grounding system seen here. http://sigma-automotive.com/EGS/egs.php


Monday, November 5, 2007

Grounding kits ,Benefits , Why use them , How they work


How does this benefit my car?:
More strands of wire translates into less resistance which translates to more effeciency. And with the thicker wires, you also ensure your power-hungry components are grounded as best as possible. With more effecient grounds, your engine will see less parasitic loss via the electrical system. Most new cars still come with barely adequate ground cable's and usually consit of 8-10 gauge cables made of less effecient material. These cables often have only 200-500 strands.


What can I expect to see by installing these?
Many magazine's have tested these Ground Wire kits on various models, all of which saw some kind of power gain. Anywhere from a 2-15whp peak gain in the recent Import Tuner article. Of these cars, the average gain throughout the powerband was about 2-5 whp. You can expect a 2-6whp peak gain if you own a 1.6-2.2 liter 4 cylinder car and at least a 1hp gain throughout the powerband, and maybe more.
On top of that, you will notice increased throttle response due to a better spark, brighter headlights, and your stereo system won't strain your alternator as much as before (ie: less headlight dimming when the bass hits).
You should also immediately note a smoother idle when you first start your car.


What aftermarket companies Make this kit?
The Import tuner article tested the Sun Automotive "Hyper-Ground" wire kit which consist of 5 wires which are connected in a "daisy chain" setup. Sun Automotive patented this form of connecting ground wires which no other company can mimic. This kit comes in 5 colors and sells for $104-120+ from Sun Automotive.
Arospeed makes a kit with 5 wires which uses a distribution block. You string the wires to various parts of your engine, and the distribution block is connected to your negative battery terminal. This kit sells for about $60-80 and comes in red, yellow or blue.
HKS sells a "Circle Earth" kit which is also a distribution block style kit and includes 8 wires total, but the wires are 8-gauge. This kit sells for $120-150 on many websites.
These kits have a mounting system that allows you to upgrade in the future. If you add a HID headlight kit, or just want to get about 20 percent brighter light out of what you have then you have flexability to add direct grounds to the battery in a neet and easy way.


The best grounding solution is Multiple points with connections in between those points. At least 5 grounding points are recomended. Original manufacturers normally make 2-3 grounding points on the engine.

Starnes turbo heatshield finished before and after

After an hour of cutting , some trial and error and some wasted material. The shield pic.


Unused Sections that were cut out of the Stainless Blank.


Testing the fitment and makin small cuts.


Here is the Heatshield before and after. Its 5 dollars worth of metal and about an hour worth of labor to get it cut. It doesnt look bad, well just need to see how functional it is later. :) The heatshield is 22 guage Stainless steel. It was originally a tubular shape and I cut a 4 in x 8 inch section out to fit. It is somwhat fleixble, so if you lean on it , it will give until it touches the turbo housing. Here is the first post for the heat shield idea. The metal tube shown there is my air filter heat shield. I was using it to see what it would look like. Click here to see begining of article. :)

http://upgradecar.blogspot.com/2007/10/making-turbo-heat-shield.html

Thursday, November 1, 2007

Turbonetics Boost Controller


The Turbonetics Boost Controller came in. They are 89.99 plus shipping. This picture is very close to what I have however my tubing is not blue its black. The Boost controller may be mounted inside the engine bay or inside the car is you dare run 15 ft of vacuum hose. Because the Controller is driven by vacuum, the shorter the tubing between connections the faster and more responsive its operation. I am thinking a nifty spot under the hood would be great. This item is said to be able to control boost from 0-25 psi. The purpose of a Boost controller is to limit the pressure going to the opposite side of the spring. Your wastegate spring holds the gate closed pressing against the piston Diaphragm. Pressure from the intake ( when under boost) creates pressure on the opposing side of the spring by a vacuum line. Lets Say you have a " 5 pound spring" on your wastegate. As the Turbo spools up it makes boost. The boost pressure travels through the hose to the opposing side of the spring. The Pressure continues to rise under high throttle until the spring begins to depress opening the wastegate. The wastegate lets exhaust gasses pass around the turbo directly to your exhaust. This slows the turbos speed and reduces pressure. This process happens several times per second, and the wastegate moves every time your foot moves on the accelerator, let off it opens, press down it closes until the desired boost pressure is reached then the turbo stops speeding up.