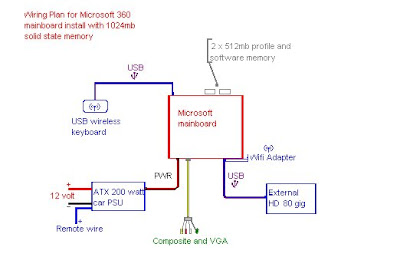


The Eagle Talon and Mitsubishi Eclipse Community of DSM. Before and after of Hahn Racecraft FMU, Walbro 255L fuel Pump, Red Powder Coating,420a Turbo install ,Custom Xbox 360 install, Water cooled Xbox 360 . Chattanooga TN and Atlanta GA area. Installation of brands like: Diamond Audio Subwoofers, Diamond Audio Amp , Apexi Boost controller and SAFC-II for 420a and 4g63, Triplite Inverter install Wideband O2 Sensor

 This is what I came up with to mount it. I hope this is strong enough or I will need to go by the OEM metal brackets. I will need to drill two holes for the screws so this can be mounted. My biggest concern is the DVD player flushing to the bezel. As you can see it can be done in the picture above however I dont know if it will be able to slide forward will the bezel i made having such tight clearance. I may need to sacrifice flushing the unit to make sure it can open. I will only slide it out enough for the screen to open without resistance.


 The Xbox 360 on the dash is a tight fit overall. I this picture the 360 is sitting inside the enclosure. The unit is sitting about 1/2 to 3/4 inch lower that it will once it has been mounted. This is to promote airflow out the bottom cooling fans and leave room for video and power cables. Three screws across the top, on in the top left hand corner, and two on each side of the DVD drive. These are already original mounting points within the original case an Xbox 360 is sold in from the factory.
 This is the straight forward view from the passenger seat. Agian this is the 360 about 3/4 inch lower that is will be mounted. The entire cd window will be visible when mounted after the finishing and primer is done. I am sure you noticed there is some kind of hole busted in the left corner of the glove box cover. This is where I removed the original xbox button that use to be installed with the original xbox we use to have. Since this advertantly was insterted in the update I will continue by showing what is going on with the glove box cover.
 A better view from the passenger door, more of what an ouside spectator would see.
 The original xbox button was here but before I fully removed It I took pictures to show how the original power of button and eject button was.

Ultimatly the xbox button will replace the old one , but it seems somewhat plane to only have the power button, so I descided to include the majority of the Xbox 360 faceplates features.
This is the configuration that I am going to use. The power button will be aligned with the two memory car doors, IR eye and Bluetooth button. Tbe power button will be about 3/4 inch closer to the doors and eye as I am holding them right here. The DVD tray hole ofcourse will not be included.
This is the configuration I am going to use. There is no cd tray here and each button and door will have the lip hollowed out around the edges. Once plexiglass is cut in a shap to wrap around each door they will all be lit with leds. I will have either green and red or blue. I can change what color all leds with light with a simple switch. This is mostly due to restrictions on the use of red and blue in a street legal vehicle. The two memory car doors I do not believe I will use for memory cars , but USB jacks a very easy to extend and mount inside the memory car bays.

 This is one of the better pictures, I will take better pictures with my camera in a day or two. These cameraphone pictures from the blackberry are good enough to see what was done.
 This is what the 360 looked like before the splash of red. The wide piece behind it and towards to bottom is the mount I am using to fabricate the fiberglass enclosure. Once the eclosure is finished it will float on Plexi glass lit with leds inside a painted enclosure.
 Here are the parts as they were recieved from my powder coater. I only see a couple imperfections , but they are dwarfed be the overall appearance and not noticable. The richest of all the color is on the back of the cage that will be facing the mount. That is sad times, but overall it still looks great!
 Here is a nice done picture from the cell phone. All this needs is lighting for the plexi and the trunk latch reinstall when its back from paint, both of those you can not see in this kind of picture anyways so for all intensive purposes it is done. The amp is foating on plexi glass ( floating is when it is above the install and you cant see the legs. This is about 40-50 hours of work. The initial ten hours were framing, making a floor underneath, stretching the cloth and initial fiberglassing. Then two more layers were added to the back and one to the front. About a gallon of body filler was used and 5 layers of primer. This is in the back of the GST Eclipse Spyder.
 I pulled the 02 bosch sensor and it was pretty gunked up as you can see. It is only 6 months old but they are cheap and come with a 2 year exchange warranty, so the exchange is free. :) Later I will get a NGK.
 Imagine this enclosure is in the dash at this moment. You can see how curvy the fiberglass is when we use stretch cloth to form it first. The mushroomed edges are intentional as they overlap the dash at this time. They make sure that everytime I set it back into the dash that it sits securely without screwing it down. Screwing it in and them unscrewing it over and over through the finishing of this peice would be such a pain. Also since I don't care about the edges with the excess there , if the sander chips and edge it it doesn't matter as I will trim is before installation anyway.
 This view from the back really tells all. The cloth is affixed to the frame ans stretched to edges. However now I need to apply resin and a layer of fiberglass matt to the backing. This will reinforce the enclosures shape so that it does not warp from heat or crack from pressure of sanding the opposite side to make it pretty :) PS: Anytime somthing is made of fiberglass, if it only has one layer of fiberglass matt it will warp and flex with heat. Fiberglass gets stregth from multiple layer supporting each other and bonden with resin.
  This is the bottom of the enclosure and Xbox 360. All the wires and even the fans exhuast downward. This all faces the floor board and makes wiring fairely simple as it could look like a complete rats nest and noone would know. So for now this works very well. We already have a water cooling kit so that it can operate without issues in summer temperatures. The 360 water cooling kit is from Thermaltake, but we may use an Koolance unit instead. The hoses would come out the area where the fans are now, so there are no need for extra holes or changes to the enclosure in the future.

 Here is a dry test fit. In this picture I am trying to see where the 360 needs to be inside the dash. I descided to install it 1 inch higher than seen below so it is more centered.
 Here is the 360 in the fram I made for it. This fram will only support the 360 after it is attached by screws or glue from the back. Otherwise it keeps the unit upright and level.

 Here is the updated design. If you look at the older design from a few days ago the bridge was one piece. Just for sake of adjusting I am making it a three piece. One bridge and two legs. They will only be 2" or less tall due to space constraints and a screw mounted every 3/4" on the edges. Eight screws all together. This also refects the new drive bay window installed last night. The blue coloreed material is raw plexi glass, of which ironically is covered with a blue film. Until the install is done it will stay and then later be peeled away.


East Ridge Auto Tune, installing the fuel pump, Hahn FMU and Turbo oil feed line- $ 334
Maxi Muffler, Bend intercooler pipe - $ 164
Maxi Muffler, install intake manifold, injectors, recalibrate Hahn FMU April 4 08 - $148
Tial 38mm 7.25 psi wastegate spring- $30
Accumulated Cost---------------$3290
Newly Ordered!
GPS Pioneer Avic S-1 - $399 , Thank You Jessie!!
Stage 2 Installed April 4- Candy red intake manifold, 270cc injectors installed, recalibrate FMU and exchange to 7.25psi Tial spring. - $445
To Do List-
| powered by hit-counter-download.com |